Showing posts with label Recipes - Desserts. Show all posts

Thursday, November 14, 2024

Lemon Blueberry Bundt Cake

Found here, this is definitely in the top 3 desserts I have ever made. The first time, I only greased the pan with Pam spray like the recipe suggested but it wasn’t enough so the cake stuck & broke apart. It was so moist I was able to push it back together & disguise the mistake with the lemon glaze. No one knew or cared it was so dang good. Second time, I greased it with butter then sprinkled flour all over. Perfection. The picture doesn’t show too much glaze as I was light handed. Next time, I will be more liberal with it. It’s a must to follow the instructions completely, leaving the certain ingredients at room temp where noted. I used fresh blueberries. I also measure my flour in grams with a scale to ensure accuracy but it’s not necessary if you measure it properly and not pack it down. I also used lemon extract instead of zest because I just didn’t feel like zesting however many lemons to get 2 tblsp. I will continue to do so.


2 cups (300 grams fresh) blueberries + 1 tablespoon (8 grams) all-purpose flour

2 and ¾ cups (345 grams) all-purpose flour, spooned & leveled

1 teaspoon baking powder

½ teaspoon baking soda

1 teaspoon salt

¾ cup (170 grams) unsalted butter, softened to room temperature

2 cups (400 grams) granulated sugar

4 large eggs room temperature

2 teaspoons vanilla extract

⅓ cup (80ml) fresh lemon juice

2 tablespoons (30 ml) lemon zest (I used lemon extract)

¼ cup (60 ml) canola or vegetable oil

1 cup (230 grams) full fat sour cream, room temperature

For the lemon glaze:

1 cup (120 grams) confectioners sugar

2-3 tablespoons (30-45 ml) fresh lemon juice, use as needed


Preheat oven to 350°F. Add the blueberries and 1 tablespoon of flour to a mixing bowl and toss together until all of the blueberries are coated with the flour. Set aside. In a large mixing bowl, whisk together the flour, baking powder, baking soda, and salt. Set aside. In the bowl of a stand mixer fitted with the paddle attachment, or a large mixing bowl using an electric mixer, beat the butter & sugar for about 4-5 minutes until light & fluffy. Mix in the eggs one a time until well combined, then mix in the vanilla. Slowly mix in the lemon juice, lemon zest & oil. Add the dry ingredients in three additions alternating with the sour cream, beginning and ending with the dry ingredients on low speed. Mix in each addition until just combined, making sure not to over mix the batter. 

There will be quite a bit of batter, so I suggest using a rubber spatula to turn the batter a few times to make sure everything is well combined. Then add the blueberries &  gently fold them into the batter until just combined. Grease & flour the bundt pan. Pour the batter into the prepared bundt pan & evenly spread it around. Bake at 350°F for 50-60 minutes or until a toothpick inserted into the cake comes out clean. Cover loosely with foil if needed for the last 5-10 minutes of baking to prevent excess browning. Remove from the oven & cool in the pan on a wire rack for 30 minutes, then invert the cake onto the wire rack to finish cooling.

For the glaze, in a medium sized mixing bowl, whisk together the powdered sugar & lemon juice until well combined and no lumps remain. If the glaze is too thick, add a little more lemon juice. If the glaze is too thin, add a little more powdered sugar to thicken it up. Pour the glaze on top of the bundt cake and allow to sit for about 10-15 minutes so the glaze can harden.

Sunday, November 29, 2020

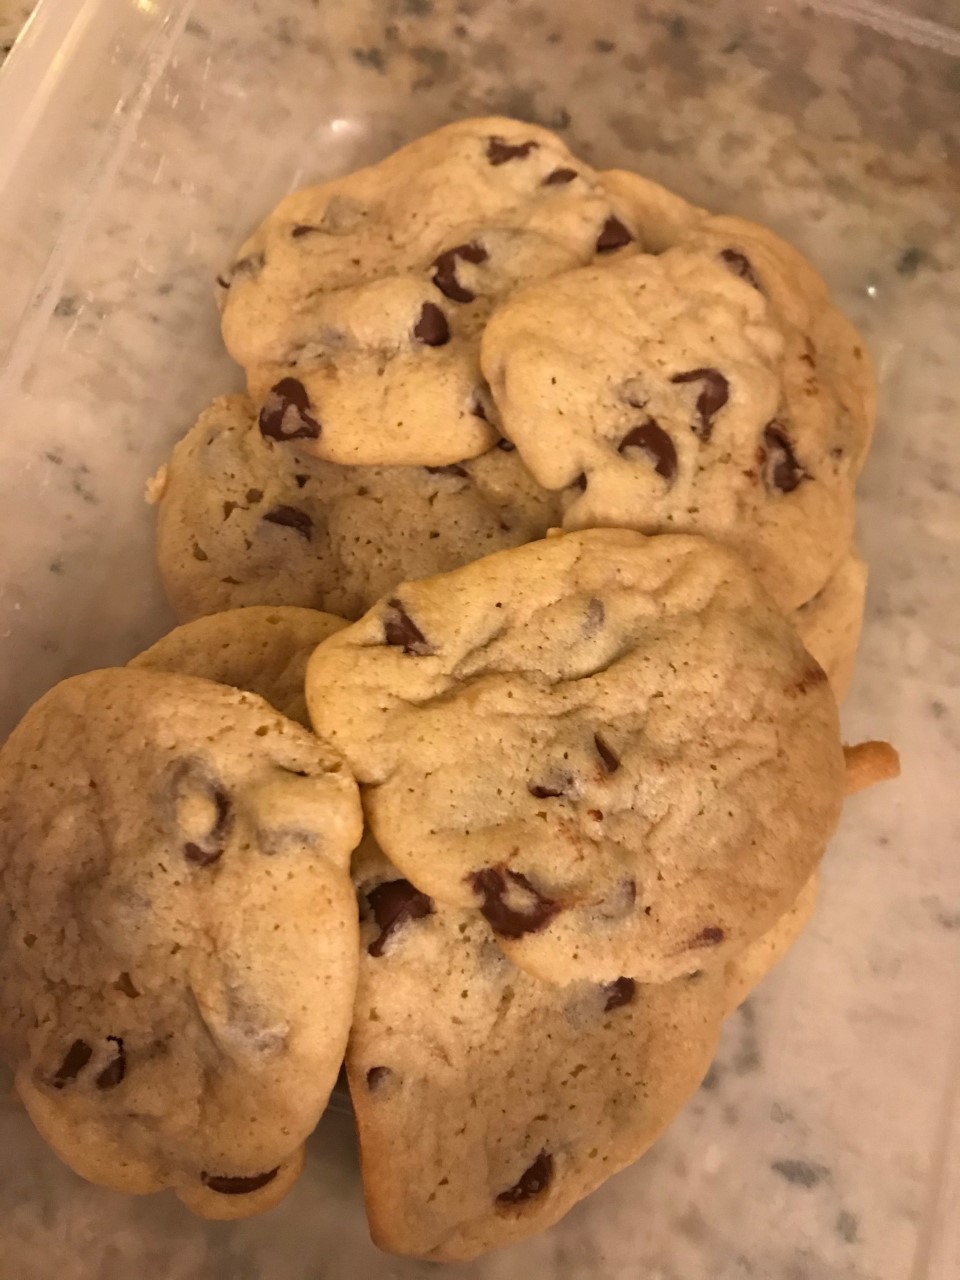
Best Ever Chocolate Chip Cookies

Found this recipe in a cookbook I had for over 15 years but never used. My son said he was craving something sweet lately so I thought I would try these. They were perfect to him. We don't like overly sweet things so these were just right. 

3/4 c butter, softened

1/4 c shortening

3/4 c sugar

3/4 c firmly packed brown sugar

2 large eggs

1 tsp vanilla extract

 2 1/4 c all purpose flour

1 tsp baking soda

1/4 tsp salt

1 12oz pkg semi sweet chocolate morsels


Beat butter and shortening at medium speed until fluffy. Gradually add sugars, beating well. Adds eggs and vanilla, beating well.

Combine flour, soda and salt. Add to creamed mixture, mixing well. Stir in chocolate morsels. Drop dough by heaping teaspoonfuls onto ungreased cookie sheets. Bake at 375 for 9-11 minutes.  Remove to wire racks to cool completely. Makes 6 1/2 dozen. 

Food for Thought: I did not have patience to make 6 or so batches so I made mine a little bigger and had to carefully monitor the time. 

Tuesday, December 27, 2016

Buckeye Fudge - PB & Chocolate


Peanut Butter Layer:
1¼ cups creamy peanut butter
1¼ cups butter (2 ½ sticks), cut into 9 pieces
1½ teaspoons vanilla extract
4 cups powdered sugar, sifted

Chocolate Layer:
2 cups (entire 12oz pkg) semi­sweet chocolate chips
1 cup sweetened condensed milk
2½ tablespoons butter

Place peanut butter and butter pieces into a medium microwave safe bowl. Microwave on HIGH for 60 seconds. Stir. Microwave an additional 30 seconds. Stir until smooth. Stir in vanilla extract. Gradually whisk in powdered sugar that has been sifted. Pour into a lightly greased 9 x 13­inch pan. Set aside.

In another medium microwave­ safe bowl, combine chocolate chips, sweetened condensed milk, and 2½ tablespoons butter. Microwave on HIGH for 45 seconds. Stir. Microwave another 30 seconds. Whisk until smooth.


Pour on top of peanut butter layer and use a rubber spatula to smooth it out. Refrigerate for at least 2 hours before cutting into squares. Notes: be sure to buy sweetened condensed milk and not evaporated milk. You will need most of a 14 ounce can. Sifting the powdered sugar will prevent lumps. 

Monday, January 27, 2014

Nutella Brownies

I am not a big brownie person but was intrigued when I saw these somewhere on the internet. And since my mom and MIL are chocolate lovers, I thought these would be perfect for dessert one Sunday dinner. These are a dense kind of brownie and everyone really loved them. I will definitely be making them again. 


1 cup (2 sticks) butter
2 1/4 cups sugar
3/4 cup Nutella
2 tbsp brewed espresso
4 large eggs
1 1/4 cups cocoa powder
1 tsp salt
1 tsp baking powder
1 tblsp vanilla extract
1 1/2 cups all-purpose flour
10 ounces semi-sweet chocolate chips or chunks

Pre-heat the oven to 350 degrees. Butter a 9x13 baking dish. In small saucepan over low heat, melt butter completely. Stir in sugar and continue cooking for 1-2 minutes, stirring constantly. Do not allow sugar mixture to boil.

Remove from the heat and stir in the Nutella and espresso until well combined. Pour butter mixture into a large bowl. Beat in cocoa powder, eggs, salt, baking powder and vanilla extract. Mix until well combined.

Stir in the flour and chocolate chips until just combined. Spread into prepared pan (batter will be very thick and sticky) and bake for about 35-40 minutes, until a tester comes out mostly clean. The edges should be set and the center should still look slightly moist, but not uncooked. 

Cool on a wire rack. Don’t cut until completely cooled.

Tuesday, July 13, 2010

Las Paletas Con Mi Amiga

{ Las Paletas is a Mexican ice pop made with whole fruit & the freshest ingredients in flavors you won't normally find in the frozen food aisle. Click on the link above to see how they'll be featured on Food Network this month. }


In late May I was blessed to be able to visit Kacey of Chronicles of a Mommy. We had been corresponding, exchanging surprises in the mail & talking for about 1 1/2 years & it all started through blogging. 


This was special. 


We have Angie & Wordful Wednesdays to thank, for that is where we started seeing one another's blog. I am so happy I met this lady for she has enriched my life far more than I ever expected. It just goes to show that a woman doesn't need a certain number of friends, she just needs the right kind. 


Visiting with Kacey was:


waking up with family


like a picnic in the park


easy like Sunday morning { before church }


And meeting Kacey was especially like....


making a friend for the rest of my life!


Kacey took me to a little hot spot for something cool to snack on after lunch. It was Las Paletas, a popular place in the art deco section of Nashville where you can get ice pops made with the freshest ingredients with the coolest combinations of flavors.


Right away I knew I wanted the cucumber chili ice pop. It was amazing!!!!!! Talk about refreshing but with a bit of heat, something you wouldn't normally expect in an ice pop & exactly why I dig it.


So as soon as I got home I started researching on how to make my own at home. While there are many recipes out there I came up with my own variation & loved it. Oh how it brought back so many sweet & cool memories. 


CUCUMBER CHILI LAS PALETAS
2 cucumbers plus an additional half cucumber, divided
1/8 cup lime juice
1/4 cup agave syrup
1/4 - 1/2 tsp cayenne pepper
Dash or 2 of crushed red pepper flakes
1/4 tsp salt


Place empty ice pop molds in the freezer to chill. Dice 2 cucumbers with skin on into 1 inch pieces. Puree in food processor or blender until smooth. Strain into a medium bowl through a fine mesh strainer, pushing out the juice. You will have about 1 cup of juice. Set aside.

Peel the remaining half cucumber & cut into little pieces. Set aside.

Add the lime juice & remaining ingredients to the cucumber juice. Pour some of the mixture into each mold, leaving about a 1/2 inch space at top. Stir several pieces of fresh cucumber into each mold. Place lid on the molds & freeze for 2-4 hours. 


Run warm water over molds to loosen pops. Enjoy.


{ Food for Thought }

I used the larger amount for both the cayenne & crushed red pepper and while I loved it so, I think I will use the lesser amount for a more subtle heat.


Lovingly Linking to Wordful Wednesdays at Seven Clown Circus

Monday, May 10, 2010

Lemon-Raspberry Mousse Squares

I hope everyone had a wonderful Mothers Day weekend!  I didn't chose to sleep in, have breakfast brought to me in bed or get a pedi or facial. All I wanted was to make a few appetizers from my ever increasing list of things to make, while spending the day with family. So that's just what I did. 

I made a dip, 4 appetizers & 1 dessert. I prepped whatever I could in advance & since I was bringing out an appie every hour or so I had time in between. I could just live on appies, can't you?! 

This dessert was definitely a hit & perfect for the hot summer to come. Easy to make, in under a 1/2 hour, pretty to look at & delicious to boot. Light & lemony but not too much, it was perfect!


LEMON-RASPBERRY MOUSSE SQUARES from Food Network

{ Printable Recipe Here }

48 reduced fat Nilla Wafers

3/4 cup boiling water
1 3oz pkg lemon flavor gelatin
1 cup ice cubes
8oz pkg reduced fat cream cheese, softened
1/4 cup sugar
2 tsp lemon zest
8oz Cool Whip Free
1/3 cup raspberry preserves
1 1/2 cups fresh fruit such as strawberries, kiwi, raspberries


tand 16 wafers around edge of plastic wrap-lined 8 inch square pan. 


(You can see they hardly stand up but just see my notes on that)


dd boiling water to gelatin mix; stir 2 min until completely dissolved. Stir in ice until melted.

eat next 3 ingredients in large bowl with mixer until blended. Gradually beat in gelatin. Whisk in 2 cups Cool Whip.

our half the gelatin mixture into prepared pan; cover with 16 wafers. Microwave preserves on high for 15 sec or until melted. Brush onto wafers. 


Top with remaining gelatin mixture and wafers.


efrigerate 4 hours or until firm. Invert dessert onto plate. Top with remaining Cool Whip and fruit.


I didn't take a picture of it once cut so here's an idea of how pretty it is.

{ Food for Thought }


The wafers won't want to stand at first so just keep the upright as much as possible. When pouring the 1st half of the gelatin mixture stop halfway & let the mixture act as the glue to keep the wafers up. You may have to adjust them more & stand them up as the pan gets filled.


{ Linking Deliciously to Tempt My Tummy Tuesday }

Monday, April 26, 2010

Banana-Nutella Galette

Play dates aren't just for my little guy anymore. I am blessed to have gotten closer with a couple of women who have a child/children my son's age. So, when we get together for a play date, sure, it's for the kids. But not just for the kids. 

We had one recently so out came the apple juice, Goldfish, the wine & a little dessert I actually created on the fly. I didn't get a chance to go to the store that day but I wanted to make something sweet for my friend & used what I had in the house.

I wouldn't have minded if it was a flop because I am close enough to her not to be embarrassed but it turned out to be one heckuva hit. The underlying amaretto flavor from the extract paired so perfectly with the hazelnut spread & bananas.

I also love that, aside from the pie crust, this was a healthier alternative than most desserts & I didn't feel a tad guilty.


Banana-Nutella Galette by Live.Love.Eat

{ Click for Printable Recipe }

1 pie crust
About* 1/4 cup plus 2 tblsp of Nutella Hazelnut spread
1/2 to 1 banana sliced
Skim milk
Almond extract
Powdered sugar (for serving)
Fat free Cool Whip (for serving)

Pre-heat oven to 375. Unroll pie crust. Spread Nutella thinly on crust leaving a 2 inch border. Scatter bananas on top.


Whisk extra Nutella in a bowl with skim milk until you reach a drizzle type consistency. Add a drop or two of almond extract & whisk well.


Drizzle over bananas. Roll the border of the pie crust covering part of the filling slightly. Bake for 20 minutes, adding a few extra minutes if crust needs to golden more. Let stand for 10 minutes. 

Sprinkle with powdered sugar, cut into wedges & serve with whip cream.


{ Food for Thought }

Measurement on Nutella is not exact, just use your judgement & spread thinly on crust.


Linking Deliciously to Lisa at Blessed with Grace for Tempt My Tummy Tuesdays

Monday, April 12, 2010

Coca Cola Chocolate Pan Cake

This past weekend was exactly what I was craving. It was the perfect balance of relaxation, productivity, family time, a little girlfriend time, a glass of wine, a mug o' beer, a lot of home organizing & plenty of outdoor time in our quaint, sweet town.

On a previous busier weekend, I made this cake for a small gathering. While I never drink soda, I was really intrigued. I would definitely make this again since it was really moist & delicious. It was also pretty easy to make for a cake from scratch. I LOVED that I only needed my whisk!!

 A chocolate lover would fall for this cake.


Coca Cola Chocolate Pan Cake

{ Printable Recipe Here }

Cake

• 2 cup(s) all-purpose flour
• 2 cup(s) granulated sugar
• 1 teaspoon(s) baking soda
• 1/2 teaspoon(s) salt
• 1 1/2 cup(s) miniature marshmallows
• 1 cup(s) (2 sticks) butter or margarine, cup up
• 1 cup(s) Coca-Cola
• 1/4 cup(s) unsweetened cocoa
• 1/2 cup(s) buttermilk
• 2 large eggs, well-beaten
• 1 teaspoon(s) vanilla extract

Frosting

• 1/2 cup(s) (1 stick) butter or margarine, cut up
• 1/3 cup(s) Coca-Cola
• 1/4 cup(s) unsweetened cocoa
• 1 teaspoon(s) vanilla extract
• 1 package(s) (16 ounces) confectioners' sugar

Preheat oven to 350 degrees F. Grease 13 by 9 glass baking dish. In large bowl, stir together flour, sugar, baking soda & salt. In 2-quart saucepan, heat marshmallows, butter, cola & cocoa over medium-high heat until bubbles form around edge of pan. Remove from heat; continue stirring until marshmallows melt.

Pour marshmallow mixture over flour mixture; with wire whisk, stir until well combined. Whisk in buttermilk, eggs & vanilla until blended. Pour batter into prepared pan. Bake 40 minutes or until toothpick inserted in center of cake comes out clean. Transfer to wire rack.

Meanwhile, prepare frosting: In 1-quart saucepan, heat butter, cola & cocoa to boiling over medium-high heat. Remove saucepan from heat. Add vanilla & stir until butter melts. Place confectioners' sugar in medium bowl. Pour hot butter mixture over sugar. With wire whisk, stir until well combined. Set aside until ready to use.

Stir frosting well; spread over top of hot cake immediately after removing from oven. Cool in pan on wire rack.


{ Food for Thought }

Check your cake at 40 min but you may need to cook it a bit longer like I did, anywhere up to an hour. The sides were perfectly done but the middle was still very moist & loose at 40, so you may want to cover it if you need to go longer.

Monday, February 22, 2010

Chocolate Mousse Torte

Hope everyone had a su-weeeeeeeet weekend!!!! Mine was just lovely. I had family over for dinner Saturday night & I made this for dessert. I found it in one of my magazines & knew I had to make it. It was too pretty not to! 

I made a few changes to it, making it even easier & also a bit healthier too. Everyone really loved it. As always, the original recipe is right here, just see my notes for changes I made. This is definitely a must make again!!!!! 

Since I didn't use the semi sweet chocolate at all, I am thinking I need to change the name to chocolate pudding torte.....nah!


CHOCOLATE MOUSSE TORTE Adapted from Kraft

Click for Printable Recipe

37 (approx) Nilla wafers
4 squares semi-sweet chocolate, divided
2 pkg. (3.9 oz. each) Chocolate Instant Pudding
2 cups plus 2 Tbsp. cold milk, divided
1 tub (8 oz.) Cool Whip, thawed, divided (I used Free)
1 pkg. (8 oz.) cream cheese, softened
1/4 cup sugar
3/4 cup fresh raspberries

Stand 16 wafers (approx) around inside edge of 9-inch round pan lined with plastic wrap. Melt 3 chocolate squares as directed on package. Beat pudding mixes & 2 cups milk in medium bowl with whisk 2 min. Add melted chocolate; mix well. Stir in 1 cup cool whip; pour into prepared pan. Beat cream cheese, sugar & remaining milk with mixer until well blended. Stir in 1 cup of the remaining cool whip; spread over pudding. Top with remaining wafers. Refrigerate 3 hours.


{ don't do what I did & try to squeeze pieces of wafers in between. there's no reason to }

Invert torte onto plate. Remove pan & plastic wrap.


 Top torte with remaining cool whip, berries & chocolate curls.


 { not the most perfect slice in pictures but it was perfectly heavenly }


{ Food for Thought }

I recommend spraying your pan with just a little cooking spray. Maybe this will help the plastic wrap to stay in place.

I used sugar free pudding since some family members are diabetic & it was wonderful. Just remember that sugar free pkgs will have less volume than the regular. I only used 2 pkgs regardless. I suggest just following the directions on the package if you’re using sugar free. Buy 3 pkgs but start with 2. Then pour in what you need, leaving room for the cream cheese mixture as well as the final cool whip.

I also didn’t bother adding the melted 3 squares of chocolate & probably won’t next time either. One final note is I just grated some chocolate rather than making curls.

{ Linking Deliciously to Tempt My Tummy Tuesdays }

Wednesday, February 3, 2010

Apple Dumplings

My Dad's birthday dinner was a success & I think he felt very special!!!! I am looking forward to sharing the incredible main course with you on Friday. 

For dessert, I made these apple dumplings along with some key lime pie. I'll take these delicious dumplings over apple pie any time! I made a variation of these a long time ago but without the intriguing addition of soda so when I saw this version from a fellow blogger I knew I had to make it. I'm not a soda drinker but couldn't wait to see the effects of adding it. The soda thickens & adds a sweet gooeyness you gotta love.

I will be making these often, especially since they are incredibly easy.

You gotta try 'em!!!!

 { Pictures show a halved recipe }

APPLE DUMPLINGS

{ Printable Recipe Here }

2 pkgs Crescent Rolls
2 large Granny Smith apples
1 stick butter
1 1/2 cups sugar
1 tblsp cinnamon
1 12oz can Mountain Dew or Sprite

Grease a 9x13 baking dish. Peel & slice each apples into 8 slices. Roll each apple slice in one section of crescent roll. Place rolled slices into greased dish.

Melt butter. Add cinnamon & sugar & lightly mix. Pour mixture over apples. Pour can of Mountain Dew over all.


Bake at 350 degrees for 35-40 minutes. Serve warm with ice cream.


{ Food for Thought }

You can probably get away with 1 cup of sugar but use your judgement. The mixture is also very thick so you actually don't pour it as much as you place some over each apple.

The 2nd time I made these I decided to put them under the broiler for just 1 minute to get browner. It also made a nice crunchy texture on top. Hubs didn't like it that way but I did. Up to you!


Tuesday, January 5, 2010

Fresh Raspberry Sour Cream Crumb Cake

That's fresh, as opposed to old & stale, which really wouldn't flow too well in the title. Anyhoo, this was one of those "gotta make it soon" recipes even though I am not a huge sweets eater. I figured I'd make it & then pawn it off on my wonderful co-workers as well as my parents who came over for dessert on Sunday. It was so light & not very sweet at all. Perfect for a holiday & even better for a brunch or Bunko or something with all the ladies. It was even better the next day, served at room temp!!!!!


Courtesy of Williams-Sonoma

FRESH RASPBERRY SOUR CREAM CRUMB CAKE

Printable Recipe Here

For the crumb topping:
• 1 cup all-purpose flour
• 2⁄3 cup granulated sugar
• Grated zest of 1 lemon
• 8 Tbs. (1 stick) unsalted butter, melted

For the cake:
• 1 3⁄4 cups all-purpose flour
• 1 cup granulated sugar
• 2 tsp. baking powder
• 1⁄4 tsp. baking soda
• 1⁄4 tsp. salt
• 3 eggs
• 1 cup sour cream
• 1 tsp. vanilla extract
• 2 cups fresh raspberries
• 2 Tbs. confectioners’ sugar

Preheat an oven to 350°F. Grease & flour a 10-inch round springform pan.

To make the crumb topping, in a small bowl, stir together the flour, granulated sugar & lemon zest. Add the melted butter & stir with a fork until the mixture is crumbly. Set aside.


To make the cake, in a bowl, stir together the flour, granulated sugar, baking powder, baking soda & salt.

In another bowl, whisk together the eggs, sour cream & vanilla until well blended. Make a well in the center of the flour mixture & add the sour cream mixture.


Beat until smooth & fluffy, about 2 minutes. Pour the batter into the prepared pan & spread evenly. Cover evenly with the raspberries. Sprinkle the crumb topping evenly over the berries.


Bake until the topping is golden brown & a toothpick inserted into the center of the cake comes out clean, 38 to 42 minutes. Transfer the pan to a wire rack & let cool for 20 minutes. Remove the sides of the springform pan.


Dust the cake with the confectioners' sugar & serve warm or at room temperature, cut into wedges. Makes one 10-inch cake.


{Food for Thought}

It was done at 40 minutes but I wanted the top to be a little more golden so I put it under the broiler for just 1 1/2 minutes, watching it the whole time. This cake was even better the next day. To be safe I stored it in the fridge but then took it out & served it at room temp. Also, I added more raspberries then what you see in the picture above. There was hardly any empty spaces once I was done.


Courtesy of My Kitchen


{ Linking Deliciously to Tempt My Tummy Tuesdays
and Wordful Wednesdays at Seven Clown Circus }

Tuesday, December 15, 2009

Oh Fudge!!!!!!!!!!

How is it that there are only 10 days until Christmas??? This is the first time in my Christmas hosting history that I don't even have my menu finalized. Usually, it's done at least 3 weeks before. How 'bout I commit to sharing it with you this Friday! There, some accountability, a reason to get 'er done!

Until then, lemme share some fudge with you. I made this a couple of weeks ago & brought some into work. Everyone really enjoyed it. It seemed to be a bit softer than the usual fudge but the flavor was wonderful & this was super easy to make. No need to use a candy thermometer for this fudge recipe!


Peanut Butter Chocolate Fudge

{Printable Recipe}

3 tblsp butter
1 ½ cup sugar
2/3 cup evaporated milk
¼ tsp salt
¾ cup peanut butter
2 cups mini marshmallows
1 tsp vanilla extract
¼ cup semi sweet chocolate chips

Bring butter, sugar, milk & salt to a boil over medium heat, stirring constantly.


Boil for 5 minutes, stirring constantly. Remove from heat.

Stir in peanut butter, marshmallows & vanilla. Stir vigorously for about 1 minute or until marshmallows are melted.


Stir in chocolate chips until fudge appears somewhat marbled. Pour into a lightly greased 8 x 8 pan.


Chill until firm. Cut into squares.


{Food for Thought}

Even though I am not a huge chocolate lover & this fudge has more of a peanut butter than chocolate taste, I do recommend adding more chocolate. Maybe even double it. I plan to next time & see where it takes me.


If you like a little more chocolate in your fudge & a little toffee to boot, try this:

Thursday, November 19, 2009

Mini Cheesecakes with Fruit & a Winner!

Thanks to everyone who entered my Gourmet Cheese Tasting Party Giveaway last week. I enjoyed reading all the ways you slow down & savor the moments in your life. Hopefully, I will put a few of them into play. I am happy to say that Reeni from Cinnamon Spice & Everything Nice is the winner!!!

But no one loses today. Not with these adorable desserts. I've been making these mini cheesecake tarts for a long time now & everyone loves them. They're so quick & simple to make & delicious to boot! I like to make a variety of blueberry, cherry & either strawberry or apple.


MINI CHEESECAKES WITH FRUIT from Paula Deen


(2) 8oz pkgs 1/3 less fat cream cheese, softened
(1) cup sugar
(1) tsp vanilla extract
(2) eggs
(12) vanilla wafers
Pie filling or fresh fruit - blueberry, cherry, apple
(1) pkg cupcake holders

Preheat over to 350. Line each cup of a 12 muffin pan with a cupcake liner & lay a wafer flat side down in each.


Beat cream cheese with mixer until fluffy. Add sugar & vanilla. Beat well. Add eggs one at a time beating after each addition. Spoon cream cheese mixture over wafers. It should almost come up to the top. Bake for 20-25 minutes.


Check with toothpick after 20. Allow to cool completely on a rack.


The middle will collapse a bit & this is perfect to hold the fruit. Fill each tart with fruit. Cool in fridge until ready to serve. I like to take them out 10 minutes prior to serving just to get some of the chill out.


{Food for Thought}

I like to make these a day ahead of time so I'll put the cheesecakes in the fridge & fill them with fruit the day of serving.

I have found that pie filling does not freeze well so if you're not going to use it up I recommend using fresh fruit. For strawberries & blueberries just chop up your fruit, mashing just a few of the pieces, add some lemon juice & sugar & let sit at room temp for 30 min.  This process is called "to macerate." You will have a syrupy fruit. If using fresh apples, just saute in some butter & cinnamon.

~ ~ ~ ~

{ Happily linking to Friday Food with Mom Trends }
Have a great weekend everyone! I have some Italian specials coming up next week.