Thursday, November 19, 2009

Mini Cheesecakes with Fruit & a Winner!

Thanks to everyone who entered my Gourmet Cheese Tasting Party Giveaway last week. I enjoyed reading all the ways you slow down & savor the moments in your life. Hopefully, I will put a few of them into play. I am happy to say that Reeni from Cinnamon Spice & Everything Nice is the winner!!!

But no one loses today. Not with these adorable desserts. I've been making these mini cheesecake tarts for a long time now & everyone loves them. They're so quick & simple to make & delicious to boot! I like to make a variety of blueberry, cherry & either strawberry or apple.


MINI CHEESECAKES WITH FRUIT from Paula Deen


(2) 8oz pkgs 1/3 less fat cream cheese, softened
(1) cup sugar
(1) tsp vanilla extract
(2) eggs
(12) vanilla wafers
Pie filling or fresh fruit - blueberry, cherry, apple
(1) pkg cupcake holders

Preheat over to 350. Line each cup of a 12 muffin pan with a cupcake liner & lay a wafer flat side down in each.


Beat cream cheese with mixer until fluffy. Add sugar & vanilla. Beat well. Add eggs one at a time beating after each addition. Spoon cream cheese mixture over wafers. It should almost come up to the top. Bake for 20-25 minutes.


Check with toothpick after 20. Allow to cool completely on a rack.


The middle will collapse a bit & this is perfect to hold the fruit. Fill each tart with fruit. Cool in fridge until ready to serve. I like to take them out 10 minutes prior to serving just to get some of the chill out.


{Food for Thought}

I like to make these a day ahead of time so I'll put the cheesecakes in the fridge & fill them with fruit the day of serving.

I have found that pie filling does not freeze well so if you're not going to use it up I recommend using fresh fruit. For strawberries & blueberries just chop up your fruit, mashing just a few of the pieces, add some lemon juice & sugar & let sit at room temp for 30 min.  This process is called "to macerate." You will have a syrupy fruit. If using fresh apples, just saute in some butter & cinnamon.

~ ~ ~ ~

{ Happily linking to Friday Food with Mom Trends }
Have a great weekend everyone! I have some Italian specials coming up next week.

Thursday, November 12, 2009

Slow Down & Savour....

The holidays are upon us & soon we'll all be rushing around preparing for family, friends & celebrations. Now is a good time to talk about how you slow down & savour the right moments. If you do, you’re going to win something delicious right here! But first…

I try to slow down & savour life as much as I can. I’m not always successful but when I am, you can find me sitting outside on a Saturday morning enjoying a cup of coffee under the palm trees. Or bench side, watching my little guy make friends at the park. And of course, in the kitchen perusing recipes & cooking with not only every last utensil but with all of my heart. Cooking something like this….


{Cheese & Apple Gallette}

~ Printable Recipe Here ~

Apples & cheese, tossed with brown sugar & pecans & a bit of butter, baked in a pie crust….oh my…you must make this now -


I received this recipe from Alouette along with an amazing giveaway package. The gallette was absolutely incredible & easy to make. I enjoyed it last Sunday with my best friend over a glass of white wine as we were savoring the last bit of our birthday celebrations from October. I love to drag out savor a celebration.

I have been cooking with Alouette cheese products for a long time & just love them. This Cheesy Zucchini & Red Onion & Flatbread is amazing & one of my favorite appetizers. I don't do many giveaways & will only giveaway what I would want myself...


That's why I was so excited to give away this, courtesy of http://www.alouettecheese.com/:

Gourmet Fall Cheese Tasting Party Giveaway
(Valued at $150)

  • Two toned wooden cheese board with accessories tucked away in 2 swing out drawers. Stainless steel accessories include fork, knife & spreader as well as a corkscrew, bottle stopper & drip ring.


{ I love the shape of this cheese board }
  •  Cheese markers (not shown but really cute)
  •  Customized Cheese Rating Cards with Pens for a Party of 10

{ How cool is that? They will say whatever you want them to. }
  •  Alouette recipe cards for entertaining
  •  Alouette coupons
  •  Slow Down & Savour Tips
All you have to do is comment & tell me how you slow down & savour life. For an extra entry, just post about this on your blog & tell me that you did. Giveaway ends on Monday at 12 noon.


In the meantime, go ahead - slow down & savour something good this weekend! 

{ Then Go See Mom Trends Friday Food }

Tuesday, November 10, 2009

Bourbon Chicken

I am still behind in reciprocating visits from my SITS day so I've minimized my posting until I'm caught up. I do have a special treat on Friday which involves a wine & cheese party for you & an amazing apple gallette. I am excited so make sure to check in.

In other food news, this dish was wonderful served over Jasmine rice, one of my favorites! While it tasted a little different & healthier than the restaurant version, it was delicious. I will make it again but with the addition of some red bell peppers. Quick & easy yet truly satisfying for a weeknight meal. Since I love cooking with alcohol, I was disappointed to see no bourbon in this but feel free to add about 2 tblsp if you're looking for authenticity.


BOURBON CHICKEN

{Printable Recipe}

1 lb boneless, skinless chicken breasts, cut into bite-size pieces
1-2 tblsp olive oil
1 garlic clove, crushed
1/4 tsp dried ground ginger
3/4 tsp crushed red pepper flakes
1/4 cup apple juice
1/3 cup light brown sugar
2 tblsp ketchup
1 tblsp cider vinegar
1/3 cup reduced sodium soy sauce
1 tblsp cornstarch/1 tblsp water mixed (if needed)

Heat oil in a large skillet. Add chicken & cook until lightly browned. Remove chicken from skillet. Add remaining ingredients, heating over medium heat until well mixed and dissolved.


Add chicken and bring to a hard boil.


Reduce heat and simmer for 20 minutes, or until chicken is cooked through. If you prefer a thicker sauce, add the cornstarch/water mixture to reach desired consistency. Serve over hot rice, if desired.


{Food for Thought}

A MUST for me when making this again is to add some red bell peppers. They'll add another dimension to the flavor as well as a crunchy texture, all while enhancing the looks of this dish! Also, you can add 2 tblsp bourbon to the sauce if you prefer.


I lost my source for this recipe, another blog, so if it's yours let me know & I will link you. I have gotten in the habit of emailing recipes to myself so they show up on my iphone, this way I can shop for the ingredients straight from my phone. UPDATED: Thank you, Bake It After All

Friday, November 6, 2009

C-C-C-hristmas is Coming.....

I know....it's not even Thanksgiving & I'm busting out Christmas on you. But you know how fast time flies & it will be here before we know it. I also don't host Thanksgiving at my house & go very big on Christmas so it's time for me to get myself thinking & planning.

Last year I got a lot of "I wish I had thought of thats" so I thought I'd give you a review of last year/preview of this year. Just click on the links for details of my past Christmas ghosts, uh, posts.

Delicious edible gifts:


Decorating Ideas:


This was probably weirder for me to post than some of you to read because I still can't seem to get my head around Fall with 85 degree weather here in FL still. But it's coming!!!!!!!!!!!!!
Have a great weekend everyone!

Wednesday, November 4, 2009

Fried Spinach Ricotta Rounds

I found this beautiful recipe over at Chef Chuck's. He creates amazing Italian dishes that make my mouth water whenever I visit. I made these during the week as my dinner so that I could forgo the guilt of frying, even though this is not a deep fry. Just about 1/4 " of oil is all you need.

I will definitely be making these again as the combination of spinach, ricotta & garlic just makes me very happy!!!! They were so delicious I didn't need any sauce for dipping!


FRIED SPINACH RICOTTA ROUNDS

5 cups fresh spinach
3/4 cup ricotta cheese
1 cup parmigiano cheese, grated
2 garlic cloves, minced
2 eggs
1 cup panko breadcrumbs (I used Italian style)
Salt & pepper to taste
Olive oil for frying
Marinara sauce for dipping (optional)

Wash & dry spinach leaves, chop & set aside. In a large bowl mix ricotta, parmigiano, garlic, 1 egg, 2 tablespoons breadcrumbs, salt & pepper. Add spinach & mix well.


Form into small balls or patties. Dip in beaten egg then breadcrumbs. Updated: With the round in one hand, use your other hand to just smear some egg on each side of the mixture. This will be enough.


Heat oil to 350 degrees & fry a few at at time until golden brown, about 1 1/2 minutes on each side.


Drain on cloth or paper towels, sprinkle with a bit of salt & a little parmigiana cheese & serve.


{Food for Thought}

The original recipe had these formed into balls which I loved. But after forming them & starting to fry them, while starving, I decided to flatten them gently into patties so they'd fry quicker. A ball, well, would take more supervision & turns. I also tore my spinach leaves roughly, just discarding the stems.

~ ~ ~ ~ ~ ~ ~ ~ ~ ~

Thank you to everyone who shared in my SITS day/Birthday last week. I have been making my rounds to thank everyone & am only half way there. I WILL be by your place so leave the light on!

Monday, November 2, 2009

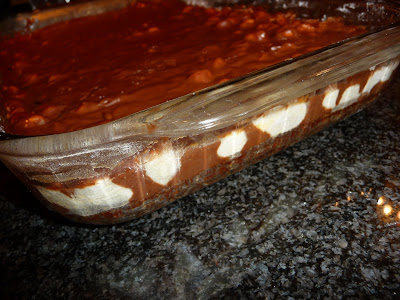
Mississippi Mud Brownies

I made these little treats to bring to a friend's house recently.

They are very rich & decadent & for the biggest of chocolate lovers. If you want to make something chocolately & special from scratch then these are for you.


MISSISSIPPI MUD BROWNIES
from Southern Living Christmas Cookbook

4 1 oz squares unsweetened chocolate
1 cup butter
2 cups sugar
1 cup flour
1/8 tsp salt
4 large eggs, lightly beaten
1 cup chopped pecans
2 1 oz squares unsweetened chocolate
1/2 cup evaporated milk
1/2 cup butter
1/2 tsp vanilla extract
4 1/2 cups sifted powdered sugar
3 cups miniature marshmallows


Combine 4 squares chocolate & 1 cup butter in a large saucepan. Cook over low heat, stirring until chocolate & butter melt. Remove from heat.

Combine 2 cups of sugar, flour & salt. Add to melted chocolate mixture. Add eggs & pecans; stir until blended.

Spoon batter into a lightly greased & floured 13x9x2in pan. Bake at 350 for 25-30 minutes or until a toothpick inserted comes out clean.

Meanwhile, combine 2 squares chocolate, milk & 1/2 cup butter in a saucepan. Cook over low heat, stirring often, until melted. Remove from heat. Transfer to a medium bowl. Stir in vanilla. Gradually add powdered sugar, beating at low speed with an electric mixer until frosting is smooth. Sprinkle marshmallows evenly over warm brownies. Quickly pour frosting over marshmallows, spreading evenly. Let cool & cut into squares.


{Food for Thought}
I recommend making these in advance, even a day, to allow them to set. We enjoyed them much better the next day after they had been refrigerated. Now, I don't make brownies much & I am not sure if you need to refrigerate these but if I was to make these again I would make them the day before, refrigerate, then let sit at room temperature before serving just to get some of the chill out. And if you don't refrigerate them I still recommend making at least 8 hours in advance.

~ ~ ~ ~ ~ ~

Since I am not the biggest of chocolate lovers, the dessert below is more my speed & one of my favorites of all time.


Visit Blessed with Grace for More TMTT